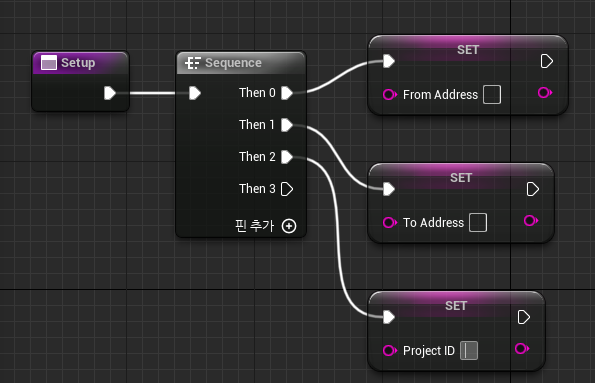
# WalletConnect 2.0 and Unreal Engine 5: Hello World Example

### Hello World

1. Prepare DeFi wallet or MetaMask.
   * rpc: <https://evm-dev-t3.cronos.org/>
   * chainid: 338
   * currency symbol: tcro
   * explorer: <https://explorer.cronos.org/testnet/>
2. [Download walletconnect demo project](https://github.com/cronos-labs/play-unreal-demo/releases/download/v0.0.11-alpha/CronosPlayWalletConnectDemo.zip)
3. Open the "ThirdPerson/Code/MyWallet" file and navigate to the "Setup" function

   1. ProjectID:
      * Visit WalletConnect Cloud.
      * Go to the Projects section.
      * Click on Create to generate a new project ID.
   2. From Address:
      * Enter the signing address (the address from which the transaction will be signed).
   3. To Address:
      * Enter the receiver address (the address to which the transaction will be sent).\\

   <figure><img src="https://1786307500-files.gitbook.io/~/files/v0/b/gitbook-x-prod.appspot.com/o/spaces%2FqXsIo4b4WtOTfICyOIxa%2Fuploads%2Fgit-blob-9f23540a1d68c3ade707ade028b01f3a58f72880%2Fimage.png?alt=media" alt=""><figcaption><p>enter <code>from address</code> , <code>to address</code> , and <code>project id</code></p></figcaption></figure>
4. Run the project.
   * You can sign transactions using a DeFi wallet or MetaMask.

### Basic Flow

1. Initialize
   * Prepare the session to connect.
   * Initialize WalletConnect 2.0 in the game.
   * Sample values
     * relay server: wss\://relay.walletconnect.com
     * walletnamespace: {"eip155":{"methods":\["eth\_sendTransaction","eth\_signTransaction","eth\_sign","personal\_sign","eth\_signTypedData"],"chains":\["eip155:338"],"events":\["chainChanged","accountsChanged"]}}
     * clientmeta: {"description":"Defi WalletConnect v2 example.","url":"<http://localhost:8080/","icons":\\[],"name":"Defi> WalletConnect Web3 Example"}

<figure><img src="https://1786307500-files.gitbook.io/~/files/v0/b/gitbook-x-prod.appspot.com/o/spaces%2FqXsIo4b4WtOTfICyOIxa%2Fuploads%2Fgit-blob-c27a6cf80d8184b9f94f939dab48ebdacff7edf8%2Fimage.png?alt=media" alt="" width="563"><figcaption><p>
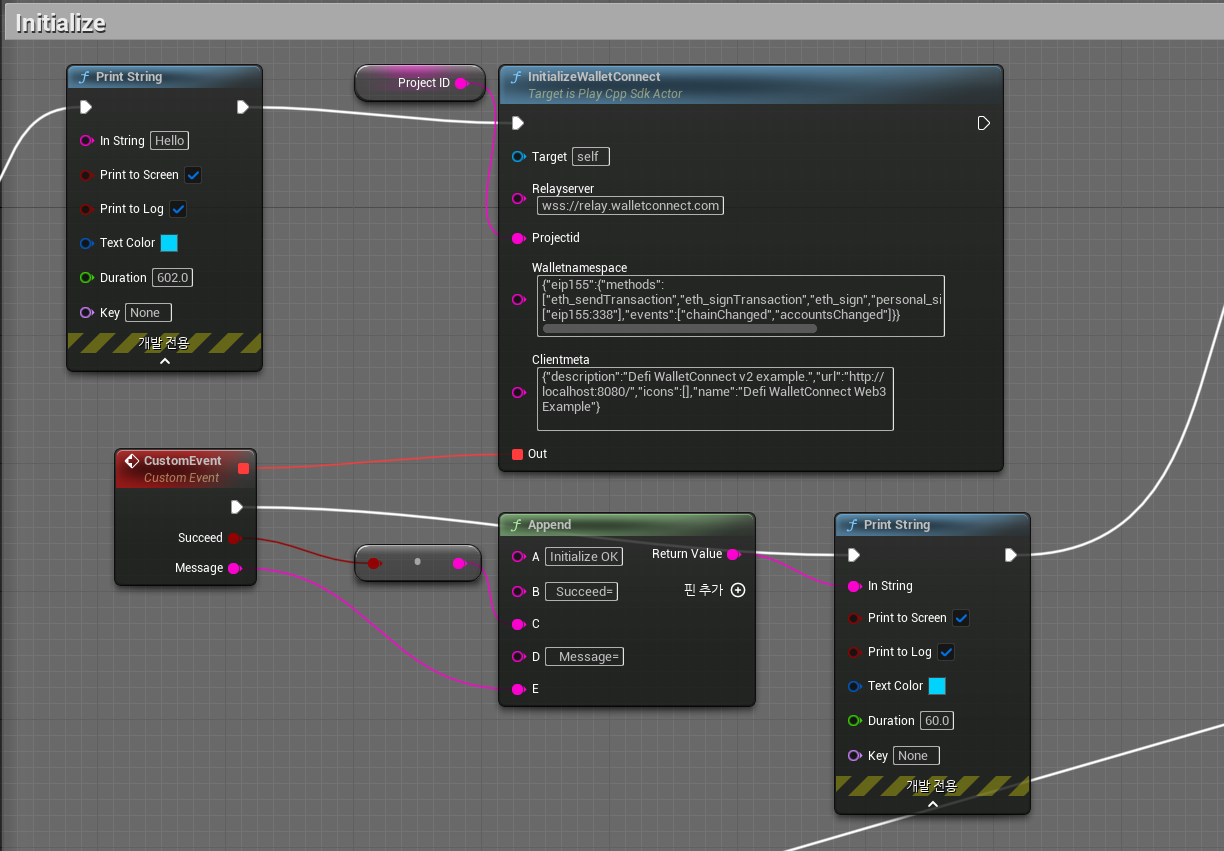
initialize WalletConnect 2.0 in the game</p></figcaption></figure>

2. ShowQR
   * Update the texture by rendering the QR code image onto it

<figure><img src="https://1786307500-files.gitbook.io/~/files/v0/b/gitbook-x-prod.appspot.com/o/spaces%2FqXsIo4b4WtOTfICyOIxa%2Fuploads%2Fgit-blob-9729b9afb80eb216621fb02e186059c443183105%2Fimage.png?alt=media" alt="" width="563"><figcaption><p>update the texture by rendering the QR code image onto it.</p></figcaption></figure>

3. EnsureSession
   * Connect to the WalletConnect session and wait until the user approves the connection.
   * To connect using WalletConnect 2.0, open your DeFi wallet or MetaMask and scan the QR code.

<figure><img src="https://1786307500-files.gitbook.io/~/files/v0/b/gitbook-x-prod.appspot.com/o/spaces%2FqXsIo4b4WtOTfICyOIxa%2Fuploads%2Fgit-blob-81eea28a67b3dbc3ba0e43fe4e9b23ff936b8d39%2Fimage.png?alt=media" alt="" width="563"><figcaption><p>to connect using WalletConnect 2.0, open your DeFi wallet or MetaMask and scan the QR code</p></figcaption></figure>

4. SendTX
   * Once the WalletConnect session is established, the SendTX screen appears in the user's wallet.
   * If the user approves, the transaction is signed and broadcast.
   * Sample Values
     * gas: 1100000
     * gas price: 10646859727182
     * value: 190012345678912
     * data: none
     * nonce: none

<figure><img src="https://1786307500-files.gitbook.io/~/files/v0/b/gitbook-x-prod.appspot.com/o/spaces%2FqXsIo4b4WtOTfICyOIxa%2Fuploads%2Fgit-blob-e74c477db9bc1f3b5c1b1fe497e37d79fce9c55d%2Fimage.png?alt=media" alt="" width="563"><figcaption><p>
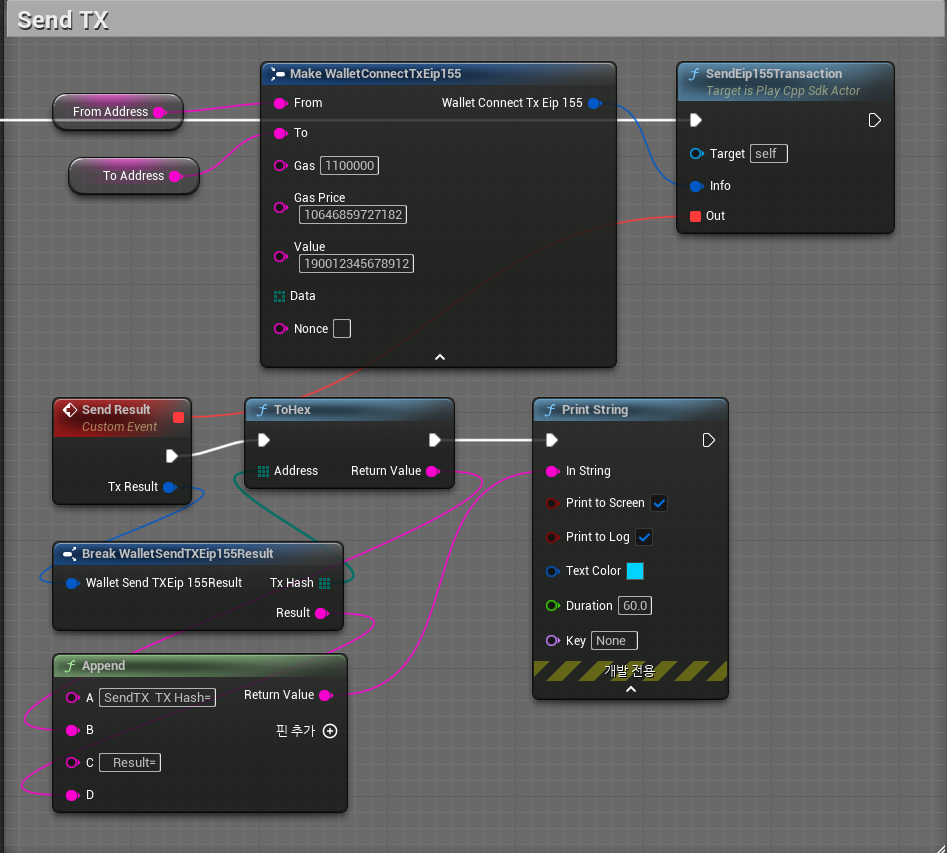
after signing the transaction with a DeFi wallet or MetaMask, the transaction will be broadcast to the network</p></figcaption></figure>
